[ Home ] [ 1st Visit ] [ Tandem Display ] [ Accessories ] [ Parts ] [ Close-Outs ] [ Ordering Info ] [ About Us ] [ Links ]
TIPS FOR PACKING SANTANA S&S AIRLINER SAFE CASE
An assistant is often very useful during this procedure!
PREPARATION FOR PACKING
1) Spread one or two large blankets on the ground
2) Remove all Pedals, those on the right when sitting on the bike are removed by turning the counter clockwise and those on the left by clockwise as they have a left or reverse thread.
3) Open the Airliner Safe Case and remove all foam layers except for the one marked #1 in the top right corner as depicted in the photo below.
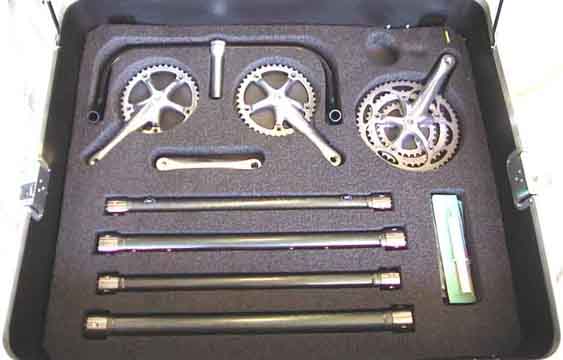
LAYER #1 PARTS PLACEMENT
4) Remove all Cranks (turn all fixing bolts CCW) & place in case, wrap rear chain with supplied protective cover and put timing chain in a baggie. Rubber or disposable mechanics or exam gloves work great here!
Caution:
Make certain the outer retaining ring of the crank arm fixing bolt does not rotate with the bolt. If it does, tighten the outer ring with the Shimano spanner tool. If it continues to rotate, remove the outer ring by turning CCW, the plastic shim washer, apply grease liberally, retighten as much as you can with the spanner and it should remain stationary.5) Using a permanent marker or a piece of electrical tape, mark the existing saddle heights to aid in re-assembly.
6) Remove Stoker Seatpost/Seat & place on blanket
7) Remove Captain Seatpost/Seat & Stoker bar assembly
8) Remove Stoker handlebar & stem from Captain seat post
9) Loosen Stoker handlebar clamp bolts and rotate stem a bit so it is in the same plane as the fore and aft portion of the bar. When done, the unit should basically lay flat on the floor without the stem interfering. Place in case.
10) Remove left front V-brake arm and place on blanket. Reinstall bolt in fork.
11) Detach all cables at the "cable splitters" found in-line by unscrewing. If an Arai drum brake is installed, no splitter is needed for this cable.
12) Remove all cables from frame attachments as you go forward from the splitter locations. To remove the cable from the slotted areas below the bottom brackets, slide the teflon straw out of the hole and then the cable will fit through the slot. Unscrew the adjusting barrels having cable use under the headtube. Coil all cables up neatly as they will remain with the handlebar. Remove computer and put in a safe location on the blanket.
13) Remove the fork steerer tube top cap, loosen the handlebar bolts that clamp the stem to the fork steerer tube and slide the entire handlebar and stem up and off of the fork. You may need to twist it back and forth while applying upward pressure. Set the captain bar and cable assembly aside on the blanket.
14) Install the retaining sleeve in place of the stem. This sleeve is provided with your S&S tandem and marked with tape stating "Remove". Reinstall the top cap and make snug tight. The whole purpose here is to hold it together for travel without it falling apart so a twist of the Allen wrench when all free movement is gone is sufficient.
15) Remove both wheels and quick releases from the hubs. Place parts on blanket.
16) Using the special S&S spanner tool, select the best size for the diameter of the coupler. Wrap a rag around the wrench and it will be easier on your hand! The couplers are all right hand threads meaning that a CCW rotation of the sleeve (acts as the nut in a bolt and nut scenario) will disassemble the coupling.
17) Carefully place each of the four center sections in the case as shown in the picture above.
18) Insert the foam layer #2 into the case.
LAYER #2 PARTS PLACEMENT
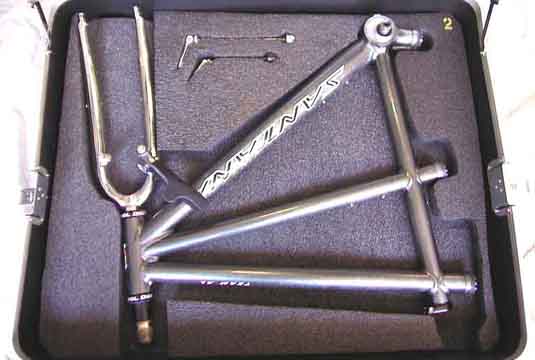
19) Install the quick releases and front frame/fork section into the case.
20) Wrap the remaining installed V-brake arm with the supplied protective covering and the black protective cover over the exposed bottom bracket axle.
21) Install foam layer #3 into the case
LAYER #3 PARTS PLACEMENT
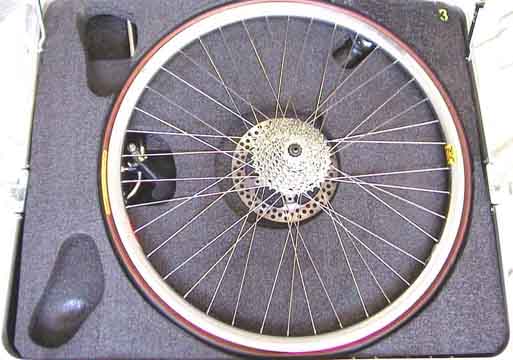
22) Deflate both tires. If large tires are used, it is advisable to remove the tires to simplify the fit. Install the wheel with the cogs up.
23) Install foam layer #4 into the case.
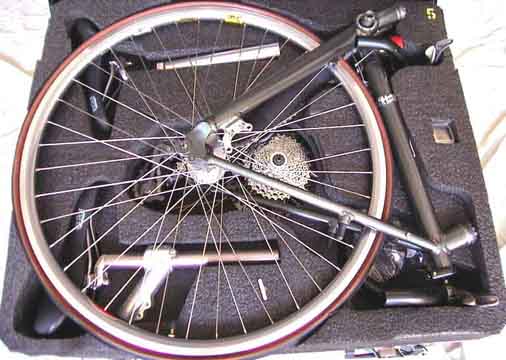
LAYER #4 PARTS PLACEMENT

24) Mark with tape or a permanent marker the relationship of the handlebar to the slot formed by the clamp. Use this as a reference during re-assembly for fitting purposes.
25) Loosen the two clamping bolts and rotate the stem as pictured above, snug lightly and install captain bar and cable assembly in case. There appears to be room here for pedals, the timing chain and any other small items. Wrap items in rags to protect everything.
26) Install foam layer number 5 into the case.
LAYER #5 PARTS PLACEMENT
27) Okay, this picture admittedly looks like a mess! Install the red cap on the protruding direct lateral tube stub, the coupler stub angling up from the stoker bottom bracket.
28) Place seat and seatpost assemblies in the case as pictured with the captain seat being toward the front of the case and the stoker seat towards the back. Note: an extra long 410mm post will not fit properly in the case and extra padding or removal from the saddle itself may be required.
29) Install the rear frame triangle in the case.
30) Install the black protective cover over the exposed bottom bracket axle.
31) Close the case while your assistant helps work the foam inside the lip of the lid as it is lowered. Make sure the side latches are released and not hindering the closing operation. Secure the side latches after hooking them with a clockwise motion. Snap the front locks closed.
This is an initial rough draft. Additions and or corrections appreciated!
SEE OUR OTHER ARTICLE ABOUT TIPS FOR ASSEMBLY
[ Home ] [ 1st Visit ] [ Tandem Display ] [ Accessories ] [ Parts ] [ Close-Outs ] [ Ordering Info ] [ About Us ] [ Links ]